Learn to Make an Easy No Sew Christmas Ornament - Beginner's Kimekomi Tutorial
Learn all the basics you need to make a simple 6-division kimekomi (tucked fabric) ornament. See every step from start to finish in real-time with no speed-ups or cuts!
In the video, which I made way back in 2015, I mention that I'm selling a kimekomi tool kit in my shop. However, I am no longer selling that kit or any other supplies. See the Tools and Materials page for links to recommended supplies.
0:10 Intro
00:55 Tools needed
02:26 Materials needed
04:12 Plotting points
08:27 Drawing lines
10:05 Cutting lines
11:28 Widening the grooves
11:53 Making batting and fabric patterns
14:32 Cutting out batting using pattern
17:59 Cutting out fabric using pattern
22:47 Gluing on batting and tucking fabric
33:37 Showing you how to trim a fabric section that is a little bit too big
35:26 Gluing cord trim
45:29 Pinning hanging ribbon and bow at top
51:00 Finishing up
Transcript:
(Crossed-out text is no longer correct information.)
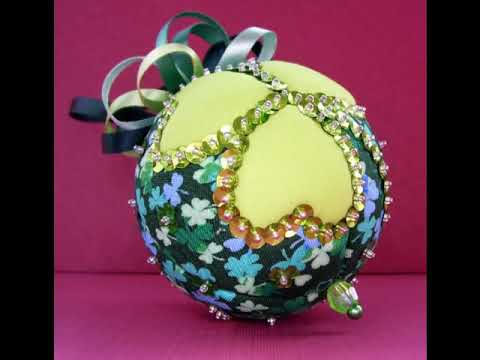
Hi everyone, I'm Alyx at Ornament Designs dot com, and in this video, I'm going to teach you all of the basics you need to know to make a very simple kimekomi ornament like this.
This is a beginner tutorial, so if you've done these ornaments before, you may want to skip this one. Today, I'm gonna do everything in real-time. There's gonna be no speed-ups. You'll see exactly what it is I'm doing in real-time, and I'm gonna try to show you some close-ups so you can really see how I'm tucking material and things like that. So, I really hope that this is useful for all you beginners out there, and I'm excited, so let's get started first thing, let's talk about tools and materials.
So, what you need is a pen of some kind. You can either use a Sharpie-type of pen, or you can use just a regular ballpoint pen; just make sure it has a nice fine point. The next thing you'll need is a measuring tape. I use centimeters. I use the metric system, so if you want to use my measurements, you’ve gotta go with the metric system. Next, you need…
If you're terrible at math like me, you'll need a calculator. Then you'll need a craft knife of some kind. Then you'll need some scissors. Some fabric scissors and some paper scissors and just on the tracing paper like this is okay. Then you'll need a tucking tool, I use an upholstery needle. This is my preferred tucking tool, but you can use anything else that has, you know, this kind of shape to it. So, alright, then, it is optional. If you want to use a lighter to melt the ends of your ribbon so they don't fray, that's fine. If you don't have one of these, it’s no big deal. All right, also you'll need a glue stick. Any kind of glue stick should do. Then you'll need some craft glue, or like Elmer's type school glue, that's fine as well. Okay, so that… I think that's all the tools that you'll need.
So, for materials, you'll need a smooth foam ball, okay, not the chunky styrofoam type, but smooth foam specifically, and then you'll need… let's see what else…
You need some quilt batting. This is a lot you don't need this much, but you'll need some quilt batting and some fabric. And then you'll need some cord, some cord trim, and you'll need some ribbon. This is a six-millimeter wide ribbon. Then you need some pearl head pins about an inch inch and a half. These are actually these are two-inch pins, which are a little bit long, but any pearl head pins should do.
Then you'll need two large sequins like this. This is about a centimeter, a centimeter in diameter diameter. Yeah, this is about a centimeter in diameter. You'll need two of these, or you can use bead caps if you prefer; that's fine as well. So I think that's all the tools and materials that you need.
So I'll give you some more details about the types of tools, and though you know the preferences and materials and those small details like that, I will actually talk about them during the tutorial while we're actually making it.
So all right, so let's um... Let's start making our ball. Okay, first, we need to mark the north Pole and the south Pole of our foam ball. There should be some factory markings that will help you find those points, and you'll just put a dot at the north pole, and you'll turn it over and put a dot at the south pole. If you find your balls, do not have any factory markings... They do not have a North Pole they do not have a South Pole, and they have an equator line. Don't buy them. Find a different ball that has all of those factory markings on it. It's very important; otherwise, it's gonna be really, really hard to make your ornaments.
Okay, so now get out your calculator, and we're going to figure out the measurements for making art lines. I'm doing a simple six-division for this ball, and my ball is seven centimeters in diameter. If you multiply seven centimeters by pi, which is 3.14, you'll get the circumference, which is twenty-one point nine eight. Then you're gonna divide the circumference by six, and you'll get three point six six. Okay, obviously, you can't be that precise. You're gonna have to do a little bit of rounding when you measure, but that's fine. So just mark any place on the equator line of your ball you can faintly see the equator line on this ball. It's a little hard to see, but you can still see this factory marking, and then you'll just measure three point six six centimeters, or three points seven, and you'll mark it. Now, I didn't mark it because I actually prefer to do it a little bit differently. I find it a little bit easier. I'm going to divide my circumference by three first and then draw a mark for the points two for a simple three division, and then I'm going to go back and mark the points for a simple six. I find that because you're rounding up and you're having to kind of make some adjustments in your measurements because you can't get super precise, and this kind of helps everything to even out in the end if that makes sense. I hope that makes sense so, um... so here I am starting from that point, which can be anywhere on the equator line, and then I'm measuring seven point three, which is my circumference divided by three, and I'm just marking a dot right there on the equator line. And again, continue measuring seven point three centimeters, and then the last one, I should end up where I started, and it's three points. Sorry... seven point three centimeters. So that's done. Next, I'll mark in between those two dots that I just drew, and it should be three point six centimeters there, okay then go over there, and I'll mark halfway between those two points 3.6, and I'll mark there, and then the last one again, three point six and I'll be finished.
So this works for any division that you want to do. For example, if you want to do a simple four-division, you'll just divide your circumference by four. If you want to do an eight-division, you'll just divide your circumference by eight, and so on and so forth. I've done as much as ten, but you can go as high as you want to, depending on the size of the ball that you're using.
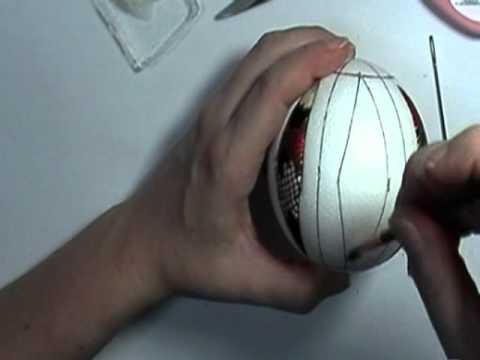
So okay… Next, what we're going to do is just connect the dots. You'll start at your North Pole, and you'll use your tape measure as a straight edge and you'll just draw a line between the North Pole and a point on the equator and your South Pole. And then you'll move to the next line, same thing, start at the top through a point on the equator, down to the South Pole. You'll draw six lines, dividing your ball into six sections. You'll need to keep your measuring tape nice and tight; otherwise, if your measuring tape slides around, then your pen moves, and you're gonna make mistakes, and your lines won't be even. If you do make mistakes, you can use some liquid whiteout to just white-out your mistakes, and then you can start over. I do that all the time.
And if you make... If it's not absolutely 100% perfect, but it's mostly perfect, that should be fine, too. Once you cut the ball and once you start tucking the fabric into cuts, the super preciseness isn't really going to matter. So anyway… So that is what it looks like when it's all finished.
Next, you'll take your craft knife, and about a centimeter down, like eight millimeters to about a centimeter, you'll cut into your foam. The foam balls that I use are quite soft, and it's really nice. It's not really really difficult to cut into the foam so I don't have to use any special tools. If you decide to use the Smooth Foam brand balls, which I have a link to on my website under tools and materials if you use that brand of ball you'll you might need a hot knife because those are really, really hard, and your wrists and your fingers are going to just be protesting by the time you're finished cutting all of the lines on your ball, so yes I suggest trying to find the softest ball that you can, but you know sometimes you don't have much of a choice and you've got to go with a harder type of ball then once again I suggest trying a hot knife if you can.
Okay, when you're finished cutting all of the lines, go ahead and take your tucking tool and run it through your cuts just to open them up a bit to widen them; it'll make it easier later on for you to tuck in the material.
All right, next, we're going to draw patterns for cutting our quilt batting and fabric, so you'll just get a piece of tracing paper and lay it over the top of your foam ball so you can see one section through the paper. And then you'll just take your pen, and you'll just sort of trace the shape of the section, and it doesn't have to be really precise; it just has to be the basic shape of that section, and this is your batting pattern. So, you’ll get your paper scissors because we don't want to dull our fabric scissors, so it's best to have two different scissors, one for paper and one for your fabric, and you'll just cut that out like so.
Okay, and then we're going to make our fabric pattern, so you'll just lay that down, we'll put it over here, and about 1 centimeter out from the edge of your batting pattern, you'll just kind of draw around that batting pattern just so it's about a centimeter larger on all sides, just like so and then we'll cut that one out and you'll see the end I sort of cut off the ends there on the fabric pattern it's kind of squared off the end it's not going to matter it'll actually be easier to tuck in the end if you sort of square off your ends a little bit on the fabric pattern, so all right so you'll cut that one out I like to mark which one is for my batting and which one is for my fabric so I don't get confused. And if you plan on making another ball just like this, you can save these and use them again for another ball.
Okay, so now let's cut out our batting here. Let's check the pattern to see if it's just about the right size. Okay, so set your fabric pattern inside, get out your quilt batting, and we need six pieces of quilt batting cut into this shape. I'm going to use one of my pearl head pins, and here I'm just pinning the pattern to the batting and then cutting around the pattern like this, and it just has to be the basic shape, it doesn't have to be super precise, but there you go.
All right, so you need six of these. Now, while I'm cutting this out, it's gonna take me a little bit; let's talk about batting.
So the batting that I'm using is kind of thin, it's I think it's like a centimeter thick it's it's quite thin. You can use thicker quilt batting if you want. You can use denser quilt batting if you want; the thicker and denser your quilt batting is, the harder it's going to be when you start the tucking process. It's just mmm… I suggest kind of going with a less dense, thinner quilt batting for your first ornament, and then, if you kind of want more of a softer quilted kind of shape for your second or third, you can increase the size of your quilt batting. Just kind of experiment with it and see what you like best. Sometimes, use thick quilt batting. Sometimes, you use thin quilt batting, depending on the ornament that I'm doing, and sometimes, if I'm doing a really advanced detailed pattern, I won't use quilt batting at all because it's just impossible on some designs, especially the ones that are really small and really detailed patterns, so to do it without batting is actually a lot easier than doing it with the quilt batting So if you want to skip this step for your first ornament, that's fine as well. Also, the nice thing about the quilt batting is if you have any sort of little imperfections in your ball, if there are any dents in your ball, or you can see somebody's marked it with their fingernails or something when they were looking at them in the shop, then you know the quilt batting cover up all of those imperfections, and you're not going to see it in your finished product. If you don't use quilt batting, your fabric is right up against the ball, and you might see those dents and things.
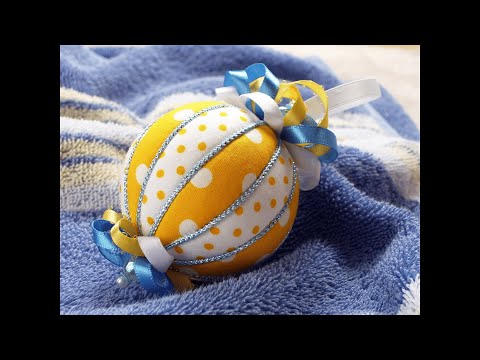
So, now we've got six pieces of quilt batting. Okay, we'll set those aside, and now, we will start on our fabric. So, I have this pretty blue fabric that goes nicely with my red snowman fabric, and I'm going to turn it over. The backside just it's a little bit lighter, so it'll be a little bit easier to see where I'm tracing, and I'll trace my fabric pattern just like, so okay I'll trace another one. Okay, so we need three of the blue and three of the red because we're gonna do alternating sections, one red, one blue, one red, one blue, okay, and it really doesn't matter whether you're tracing on the back side of your fabric or on the front side of your fabric. At least not for this ornament. On some ornaments, it actually does make a difference, but for this one, it really doesn't matter, and the edges of the fabric are going to be tucked into the grooves, so you won't see any of those if there's still some black marker on the edges of your fabric, you're not going to see that in the finished product.
All right, so while I'm cutting this fabric out, let's talk about fabric types of fabric. I prefer cotton. It's the easiest fabric to use for these ornaments but you can also use satin, silk is pretty, brocade. You can basically use any kind of fabric that you want, but the silk and satin they're slippery fabrics, and they're gonna be really, really difficult to tuck into the grooves. So, if you are an absolute beginner at this and you've never made one of these ornaments before, I really suggest that you stick to cotton. also, I suggest thin cotton, not fleece or anything really thick that's gonna make it really hard to tuck in.
I think the first ornament that I ever made, I tried using denim… I had some old blue jeans I had just cut up, so I just happened to have some blue denim fabric; tucking in the blue denim fabric into the grooves was really tough because the fabric is really thick, so the thin fabric, cotton was easiest to work with, but as you get more advanced... After you get really comfortable with making these… um, you know, try using some silk and try using some satin because they make really, really pretty ornaments; the silks and satins they're really, really special when you use nice fancy fabric.
All right, another thing I'd like to mention is that when you're using a fabric that has some sort of motif on it, some sort of pattern like this. I have my little snowman. It's really nice to have that
tracing paper cutting pattern because you can actually see through the paper, and you can see what piece of fabric you're gonna use. For example, if you're using a floral fabric that has sort of flowers bunched in different little sections on the fabric, it's really useful to have a cutting pattern you can see through so you can see what flowers you're choosing that'll be on the section of your ball. I hope that makes sense. Some people like to use clear plastic vinyl. I think tracing paper is totally sufficient, and if you're using a pattern that's already been made, I suggest transferring it to tracing paper or like clear plastic vinyl. You can see through it, and you can see what your fabric is gonna look like in your fabric section.
Okay, so we have three pieces of each color and our batting. Now we're going to put the batting and our fabric on the ball, so take your glue stick, and you're just going to put a nice thin layer of glue on one of the sections of your ball all right, and then take a piece of batting and just put it over the top of the glue, and then you'll take a piece of fabric, and you'll put it over the top of the batting, and you'll hold it down on each end and then take your tucking tool and starting in the middle and on the side I'll just tuck the fabric into the grooves like so. Okay, again, turn to the other side, and it looks like I've made my fabric cutting pattern a little bit small. It's usually bigger than this. I think maybe I might have done half a centimeter instead of a full centimeter. Sometimes, it's hard to tell when I'm just eyeballing it, but actually, it's kind of perfect. It's like the absolute perfect size; I'm not gonna have to trim anything off. Wow, that is really rare. That doesn't happen very often. Oftentimes, they'll actually be more fabric than you need, and you'll have to trim it so that you know you can tuck it in. Oh, I'll show you that later when I'm finished putting all the fabric on this ball. I'll show you how to trim when you have excess fabric, so for now, alright, it looks really nice.
Alright, now let's do the next section. We're gonna do the exact same thing, except this time we're going to use our red fabric. So once again, put a nice thin layer of glue stick glue, then a piece of quilt batting, and if your quilt batting is just a little bit too big, you can just trim off the edge. A little edge is sticking out there, so just trim that. Then, a piece of fabric. I'm gonna make sure that it's in the direction that I want. And just tuck like so. I like to start in the middle I usually do a little bit in the middle on one end and then go to the other side and do a little bit in the middle on the other end and then move back. Go to the other side; it just makes it easier, and the tucking process if you sort of go back and forth. And these fabric pieces are at the perfect size, which is really rare, and you can just smooth your fabric if you need to, so there might be a little bit of you, might have some bunching, and you can just kind of just keep smoothing over the fabric with your tucking tool, and eventually it will smooth out.
So okay, I'm going to try... Let's see; I'm going to show you a little bit of a close-up here; I'm going to try to move my hand up closer to the camera so that you can actually see a little bit better what I'm doing. Sometimes, it's hard in the video to actually see what I'm doing when I'm tucking, so, see her, I'm sort of smoothing over the fabric and then tucking it in. You can sort of use the end of the needle to kind of grab onto your fabric and tuck it. It's a little hard to describe. You just kind of have to… tucking can be difficult, um... Oops, and sometimes you drop your ball. Okay, so sometimes tucking can be a little bit difficult for the beginner. I have a whole lot of practice. I've made thousands of these things, so I make it look easy, and uh, it may not be that easy for you. I'm just, you know, have some patience and just keep going over and over it. Keep smoothing it out, and eventually, you'll get it eventually… you know, just take some practice.
So alright so um, while I'm finishing up this ball, let's talk about glue, all right, so I've used every kind of glue stick that there is. I think I've used, you know, office-style glue, I've used the stuff the kids use in school, I've, you know, I've used everything, and the glue that I'm using is kind of its sort of sticky, and a little bit wet, and it goes on blue, and then when it dries it dries clear, so I like the fact that it's colored when it goes on I can actually see where I'm putting the glue when I'm putting it on the foam ball, but then you know, like I said, it dries clear, so you won't see any of that blue color peeking through the fabric if you're using a lighter color fabric so, but yeah like I said, I've used every kind of glue stick and they all work. I prefer a glue stick. Some people use craft glue, just a regular craft glue that's liquidy um, and I don't like I don't like that it's it's runny and gets all over everything, and I really do prefer the glue stick for these ornaments.
So let's see what else I can talk about, um... Oh, let me talk about my tucking tool. The tucking tool that I'm using is an upholstery needle, um, it's just a big upholstery needle, and I found it in a pack of needles at the local 100 yen shops. Which is kind of like the dollar store in the US. The exchange rate is about 100 into the dollar, so anyway, um, and yes, yen. Sorry if you didn't know, I live in Japan. I live in Tokyo, so most of the tools and things that you'll see might have some Japanese writing on them, or I'll talk about, oh, I got them at the hundred yen store, or something like that um anyway, I have no idea where you can get these in the United States. You could probably go to a fabric shop or a craft store, and you know you might be able to find these if you cannot find an upholstery needle or you just find one, and it's ridiculously expensive I have a tool kit that I sell in my Etsy shop, and I have there's a big pack of needles there are like 20 needles in the pack, and this upholstery needle is one of the needles I sell let's see the tool kit that I have includes an upholstery needle a measuring tape in centimeters you stick this exact glue stick that I'm using here and the cutter the knife that I mean they call them cutter knives here cutters here in Japan, but it's that sliding type knife that it's really nice it's like it's like a mini box cutter and I really love it because you can just slide it closed and you don't have to worry if it's sitting in the bottom of your of your tool box or something, and you're rooting around for something, you know you're not gonna catch the end of your finger and cut yourself because you can just slide it closed, and if the in if it gets really dull you can just snap off the end and have a nice new fresh end so it's it's never, also the tool kit that I sell comes with a pack of five or ten extra blades for the knife so that's really maids and it's very affordable it's only $12 so I suggest you go over to my Etsy shop and check that out if you're it's just it's really easy it's you know the one-stop shop you don't have to go to a bunch of different craft stores looking for all these different tools you can get everything in one tool kit, so um, okay, that's enough of plugging my store and my shop. Oh, by the way, everything that I sell in my Etsy shop, the proceeds do go towards more supplies and keeping my website, so basically, you buy stuff for me. Um, I can give you more content, okay? So now we've finished putting all of the fabric on our ball looks pretty good.
Alright, so now I'm going to show you what happens when your piece of fabric is a bit too big and you've got to trim off the edges. So this is just I'm just… starting another ball here. Okay, so glue the quilt batting and then put your fabric piece over the top. This fabric piece is larger than the other pieces that I was using for the other ball, and I'm starting to tuck here, and there's just see one side is going in pretty nicely but the other side there's just a little bit too much fabric for me to tuck in. I mean, I could tuck it in, but then, you know, it would just make the next piece harder to tuck in after it, so I'm just gonna trim it off. So you just take your scissors and just trim off the excess. It's really simple: just be careful that you don't cut too much fabric, or then you're in trouble, and you'll have to start over.
So okay, so that is that. That's pretty much it. I can't think of anything else that I can tell you about tucking. If you have any questions, please ask me in the comments, and I will address those as soon as I can.
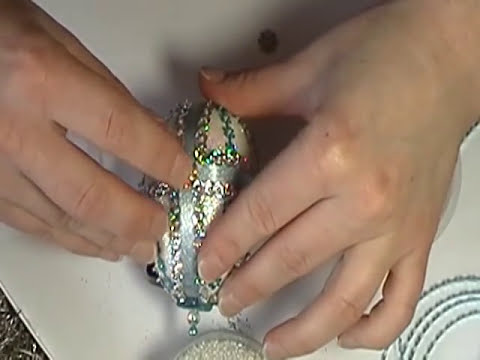
So okay, now we're going to put on the cord trim, so I have this gold cord. And okay, just making sure that my grooves are smooth, okay, so what we're gonna do is, we're going to glue the cord into the seams. Okay, so take the end of the cord and just tuck it down into the top of your ball, the North Pole, okay, just tuck it in there and then, okay, I gotta turn my cord because there's a little piece sort of, it's a little frayed, so let me turn it so the frayed end is down. Okay, alright, and then take your glue stick again and scrape off just a little bit of glue onto the end of your tucking tool, like so, it's a little hard to see, there we go, see just a little bit of glue, not too much, and then just put it right in the seam, like so. Alright, I just do that all along. Just scrape off a little bit of glue and put a little bit in the seam, and then you can just lay the cord right over the top and pat it down with your finger and just continue scraping off a little bit of glue and putting it in the seam like that, and you really don't need to use a lot of glue. Seriously, like use a very small amount of glue because if you have glue sticking out the edges, you can clean it up a little bit later, but it's just... just use a tiny bit of glue, okay. So they're glued all the way down my seam, and I'm just gonna lay my cord over the top okay, got a piece of hair stuck in there, alright, and just smooth it down with my finger okay, turn it over and continue around on the other side you don't need to cut it at the bottom of the ball, you can just continue the same piece of cord all the way around so, my autofocus is not working very nicely, sorry about that, but um I think you can get the basic gist of what I'm doing. I would use the actual zoom on the camera, except that this camera doesn't zoom when I'm using 1080p, so I try to use the highest quality I can, but that makes it impossible for me to actually use the zoom on the camera, so sorry about that.
Okay, so when you get back to the top where you started, you can just cut the cord; you don't want to cut it too short; you need to leave a little bit so that you can tuck that end into the top. There, now you can cut it and tuck the end in, or you can just tuck the cord and continue. I will show you that when I finish the next line of cord.
So if you're curious about the kind of cord that I'm using, they call it metallic yarn here in Japan. I have never ever seen this in a craft store outside of Japan. So you might look all over for it and not find it, um, and if that is the case, then again, head on over to my Etsy shop. I do sell this cord in two-meter lengths for a dollar fifty in my Etsy shop. I carry about 20 different colors of this type of cord. You can also use satin rattail cord. You can use strung sequins if you want something that's kind of flashy and sparkly, though, that you can't glue down; you're gonna have to actually pin that down. um Anyway, you know, or you can just cover the seams with ribbon, or you can just leave them as they are, you know, raw with no cord or anything, but um, traditionally, this is the way that it's done.
And speaking of tradition, I guess I haven't really discussed what kimekomi is. Kimekomi is this technique of tucking fabric into grooves to make a pattern. Originally, it was a Japanese craft used for dolls to make the doll look like it was wearing several layers of kimono, and they're really, really beautiful. Look up Hina dolls online if you're interested in that; you can also search for Kimekomi dolls on Google. It will also give you a pretty good selection of images of Hina dolls or other kimekomi-type dolls.
So okay, here you'll see that instead of cutting the cord at the top, I'm just gonna tuck it in like this, just tuck it in there, and then continue on to the next line, so there are two different ways you can do this. Cut it at the top, or you can just tuck it and go. Either way, it's up to you.
So one of the problems with making a video like this in real-time without cutting anything out or speeding anything up for the sake of time-saving is that now I've got all this time and not enough to talk about, so let's see what I can talk about while I'm finishing this up.
I can tell you about how I originally learned how to do this craft. Let's see what I want to say. Like five years ago, I moved back to Japan. I had lived here before, and then I went back to the United States for a little while, and then I came back with my husband, who's Japanese, and I saw some kimekomi ornaments in a shop in the craft store. I thought, wow, that is so cool; I'm totally gonna do that. I'm gonna try it, so I bought… there were these kits, and I bought the kits and I couldn't read the directions at all. I had to have my husband help me a little bit, translate the directions. Sorry, not a little bit, a whole lot, because Japanese is really a hard language to read, so he helped me translate it, and the parts, you know, that he had trouble translating, I just sort of figured out, and I made my first few balls, and I thought, wow, this is so cool, but I can make it better, and I just started playing around with it, and that's… I discovered how to do all of this mostly on my own, so there is also this fantastic book by Barbara Seuss and Kathleen Hewitt called Kimekomi, and I have a link to that on my website as well. It's a fantastic book with lots of tips and tricks, and there's about, like, 15 different patterns of ornaments, and then there's, like, ways to sort of change the pattern a little bit, and you end up with like 30 different designs that you can use. It's a really, really great book. I really love it, so if you are a beginner and you really love this, I suggest getting that book. I think it's it's not very expensive, and it's totally worth it.
So okay, alright, so now my cord is done, that looks pretty good, alright, so let's try to get it closed up, the focus isn't really working, sorry, okay so next, we're going to put our hanging ribbon and bow at the top of our ball. Alright, so here I'm using my lighter to melt the end of the ribbon so that it won't fray. That's totally optional. If you have a lighter, then go ahead and do it. If you don't, don't worry about it. I'm gonna cut about 16 centimeters of cord for my, sorry, not cord, of ribbon for my hanging ribbon. melt the end, okay, and then let's see. Oh, I'm gonna do a bow, so I need about, let's see, for two loops on a bow, I need 20 centimeters of ribbon. So, let me measure that out, and this is specific for the size of the ball that I'm using. I've already figured out what measurements I prefer, so if you're using a larger ball or a smaller ball, your measurements are going to be different. So alright, so... frayed there
so I'm gonna melt that, okay, and some ribbon frays easier than others, but I always melt all the ends of my ribbon. Now I'm gonna take two pearl head pins, and let's see what else, a sequin, there we are, and two sequins, these are about ten millimeters in diameter. You can also use bead caps if you want. You can buy these in a jewelry-making supply shop or a section of the craft store. That's a bead cap, so, but they're a little bit more expensive, well, compared to the sequins, they're a lot more expensive, so I save those for super special ornaments. Today, this is a simple ornament, so I'm just going to use a sequin. So you'll put the thread the sequin onto the pin like so, and then put the end of the hanging ribbon there and loop it around and thread the other end, so you've made a loop, and that is you're hanging ribbon.
Next, we're gonna do a bow. Alright, so we'll take the ribbon and fold it in half once; we're going to make two loops and see how that makes two nice loops. Okay, and thread the end on and then thread the middle on where the crease is and thread the other end on and do it in a figure-eight motion. Okay, so I'm actually gonna need more ribbon, um, let's see, I want to do a four-loop bow, so I need 20 more centimeters. Okay, melt my ends. Be careful playing with fire, kids. That's my disclaimer for the day, and be careful playing with your craft knives - yeah, no bloody fingers, please.
Okay, just fold it in half and pinch it, and that makes a nice little crease. Then, turn your needle upside down, thread the end of the ribbon onto the needle, and loop it around, making sure that the side that was down stays down. Hopefully, that makes sense. Then, pin the middle and then loop it around, and pin the end. Okay, so now we've got a four-loop bow, but you know what I think? Since we have six sections on our ball, as you make a six-loop bow, let me just make one more loop. Today, I'm using this gold metallic ribbon, but I also like to use satin ribbon, though when you do this pinch on the satin ribbon, it doesn't show as much. It's really faint. So yeah, like you really have to pinch it hard to make a crease, and then sometimes you can't find where you crease it, and this metallic ribbon creases really nicely. So it was easier for you to see, so okay, so now we have a six-loop bow.
All right now, take some craft glue. Okay, this is just your regular Elmer's type of school glue. get some glue on the end of your pin, and then just pin it to the top of your ornament. It might be a little bit difficult to pin to the top because you're going through layers of cord and fabric and then into the foam. So you might have to really put a lot of pressure to get it on there, but you know, just force it in there. Try not to bend your pin, though. And then adjust the bow. You might need to just stretch out the loops a little bit and adjust it, and once you've got it looking the way you want it to, you can either just leave it as is, or you can use some straight pins and reinforce it.
Then, on the bottom, you'll just thread a sequin onto a pin and then just pin that to the bottom, and you're finished. Yay!
All right, so that is a simple six-division kimekomi ornament, and it only took about an hour to make. About less than an hour, so um, I hope you have enjoyed this tutorial. I hope it was really informative, and I hope that it was easy to follow. And, I apologize for my rambling, but I didn't want to just be silent the whole time, so anyway, here is the finished ornament. I hope you enjoyed it so thank you so much for watching, and I'll see you again later. Bye bye.